
Dear members,
Based on recent polls and discussions with the community, we are planning to begin a new project series at projecteducate this year. The project is Tutorial Tuesdays - as often as possible, when our schedule is free (meaning no week is in progress) you will see a tutorial pop up in your message centers on Tuesdays. The series will aim to cover all galleries of DeviantArt, and of course tutorials of DeviantArt itself are also welcome.
The project series is still in the works, and we have quite a busy schedule of weeks for 2018, but keep an eye out for our first issue! By the way, if you'd like to see what we have in store thus far for 2018, check out our schedule here: Project Educate Schedule
So now for the big question - many of you expressed you'd like to contribute tutorials for this project. We'd love to hear about the ideas you have. So, if you'd like to write a tutorial for us, please send us a note explaining what your tutorial would be about! There are no time constraints, this project is very flexible, so don't feel like you will be rushed, you can work at your own pace and publish the tutorial on any free Tuesday you'd like. So, what are you waiting for? Send us a note! ![]()
A tutorial can be on any number of things, and you don't have to follow any specific model, so don't limit yourself, if you have an idea, don't be afraid to share it!
Why tutorial tuesdays instead of just doing tutorial weekends or weeks? We feel (and it seems many of you agree) that posting too many tutorials at once is a bit overwhelming for members and watchers of the group. By spreading them out, we believe users will be more inclined to notice them and read them.
Here are some great examples of tutorials in case you'd like some inspiration:
Last minute Valentine's Day crafty tutorialsArtisan Crafts Week
Tomorrow is Valentine's Day, are you ready for it? No? Me neither!If you need last minute gift ideas, this collection is for you! I put together a list of lovely craft tutorials that would make beautiful handmade gifts, my favorite kind of gift. I tried to pick tutorials with supplies that should be easy to get, or that you probably already have laying around. Most of this things should be fast and easy enough to make, even if you don't have lots of experience in any of this crafts. Let me know if you try any of them!
How do you celebrate Valentine's Day? Here in Mexico it's the day of "love and friendship", so we celebrate more than just romantic, couple's lovegrowing up I always gave gifts to my friends, and even today gifts are exchanged in offices, classrooms and within other groups of friends. Even if you're not in a relationship right now, this is a good opportunity to tell your friends that you love them. Happy crafting!
Hearts
How to take crafting commissionsTaking crafting commissions
Accepting commissions is very different from opening a store in a lot of ways, so I decided to write a separate article for it. However, a lot of what I explained in the article "Introduction to setting up your store" also applies to taking commissions, so make sure to read that article too!
Note: I’m writing this with crafting commissions in mind, since that’s my area of expertise. I imagine that some things could also apply to other kind of commissions, but I make no promises
What is a commission?
A commission is when a client pays you to create a specific craft with their idea or instructions.
How is a commission different from sales in my store?
When you sell something in your store, people are buying your work. When you accept a commission, people are hiring you to do
PE:How to Splice ComicsHello. Iingo here. I'm going to teach you how to Splice Comics or pictures in general today.
Have you ever wanted to be a comic artist and want to share your work online? Well here are two examples of great websites to host your creative comic!
Tapastic and LINE Webtoon
A Little History on Tapastic and LINE WebtoonTapastic is a webcomic program site created in October 2012 by Chang Kim from South Korea. Tapastic is operated in both Seoul and San Francisco, that way from all over the world can al
Basic Introduction to WatercolorsCommunity Week


Look at these amazing watercolor pictures! Haven't you guys ever wondered how to paint with watercolors?
Well, all I really know is the basics! Not only will I be showing you my own techniques, but also showing you others that have made tutorials for it.
Supplies! (The Basics)
- These are the watercolors I've been using for about 2 years, and they've been the best. I bet many people are used to seeing the tubes, I personally don't like them, because in a very dry environment, they die easily. I use these, they're the Koh-I-Noor Watercolor Wheel Set, have 24 colors, and they are sort of powder based. They're about $7USD (I've only seen it at the art store I ever go for supplies, so idk if they sell it in oth

How to create your own SketchbookCommunity Week
A Sketchbook is a special notebook to draw in. Many current and previous artists uch as Leonardo Da Vinci, have their own Sketchbook as a diary to write down their thoughts, ideas and experiences, whatever comes to mind. Also they might use a sketchbook to note down instructions or important facts about art. However, this 'bought' sketchbook can be very expensive and sometimes difficult to get in stores.
There is however, an alternative to having your own sketchbook without buying it. This alternative is, of course, to create your own sketchbook to your style and your taste. This involves a little work but is great for being part of your artistic growth and development. Also you can save money because the materials are not as expensive as buying a ready made sketchbook in a store. You can spend even less if some of the materials could already be found in your home.
Are you ready to start ? Follow my instructions and you will have your own sketchbook. It's worth a t
Managing Your Deviations- A Hidden Menu!Community Week
Did You Know...
...DeviantART has a mass storage system of all your gallery deviations?...you can manage all of your gallery deviations from one location?...you can move deviations into "Storage" and essentially remove them from your gallery while preserving the page view, favorite, download, and other statistics?
THIS IS ALL 100% POSSIBLE!
Many of us have deviations in our galleries that you no longer have the computer file for and would be devastated if you lost them… Ever thought, "I really don't want to download each deviation to my computer or sta.sh but I just don't want them in my gallery any longer! Then there's a handful of deviations I want to turn off comments for. I wonder if this can be done all at once?" If this is you... Keep Reading!
PE: Smoooth Animation Tutorial: JumpingSmoooth Animation Tutorial: Jumping
Hi!
Today we will learn how to make smoooth animation!
I am using a pixel black ball as the subject, but really, you can apply this tutorial to anything you want to jump! Like animals and humans (of coarse they would bend their legs instead of squish.;D)! If your animation starts to "trail", or you simply don't know how to animate, you can check out some other tutorials I have made that are linked at the bottom.
Let us begin!
Lets start with the subject. I am using a 13x13 pixel black ball, but you can use anything, even if it isn't pixeled.
Now for the squish! This is the set move to gather energy for the jump. You wouldn't jump straight legged, would you?For my ball, I made it shorter, and expanded it out some on both ends. If your subj


PE: How to embed things (WILL UPDATE FOR ECLIPSE)Written by Astrikos for projecteducate's community week.<da:thumb id="414923363"/>
You may have noticed GIFS and hot things in people's journals and profiles.
With HTML and CSS, you can add some hotness to your journals and profile.
Pretty neat, yes?
Embedding Images and GIFs
DeviantART Images
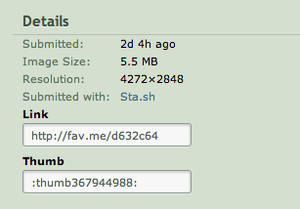
Images on dA can easily be linked with thumbcodes.
While on a deviation page, all you have to do is scroll down and look right until you see:
Copy and paste the thumb code.
:thumb367944988:
And if you want it bigger:
:bigthumb367944988:
And bam. There you are.
If that's not good enough, you can play around with the size like this.. .
<da:deviation width="Number" id="deviationID">
It's the thumbcode number without thumb in it...
Trying it out...
<d

Manga/Anime Tutorial Hub: Paint Tool SaiSo what's this all about? A while back I decided that it would be best to create a place where tutorials that are vital to Manga/Anime artists to have a home, an easy place to reach if they felt that they ever needed it. One by one articles featuring tutorials based off of specific trades and mediums will be posted, and in the end a master article that'll unite them all together. The hope is to have as much as possible in one easy to reach place. This time around its Paint Tool Sai's turn.


Basics of Paint Tool Sai Pt 2 by Neko-CosmicKitty :thumb132056096: Fire Tutorial for SAI by RayCrystal mouse paint tutorials for SAI by lmz0114 Tutorial: SAI lines: Pen tool. by Elianan
:thumb172345881: Coloring Tut. Paint Tool SAI by Arcky-Cano Paint Tool SAI tutorial IS BIG by Left-Right-Wrong Paint Tool SAI tutorial by ishii-kame ColoringTutorial and Sai Tips2 by DyMaraway
SAI: Anime Tutorial Part 1 by ivy-alive :thumb123989767: Hair-Color-Tutorial for SAI by Deamond-89 :thumb143444113: :thumb240132775:
SAI Tutorial - Painting by DarlingMionette :thumb182869069: SAI: Anime Tutorial Part 2 by ivy-alive :thumb255206249: :thumb1


Editing of infrared photographs using PhotoshopInfrared Photography
I would like to show you my way of editing infrared photographs using Photoshop CC and the NIK plugins Viveza 2 and Silver Efex Pro 2. I started about 10 years ago with infrared photography using a Fuji S3 Pro body and two Nikon lenses. Having not been satisfied with the endless exposure times, I bought a used Nikon D70 having taken lots of infrared photographs over some years. In 2013 I decided to buy a new Nikon D90 body and had it converted to 720 nm.
My newer infrared photographs are all taken with the Nikon D90 converted to 720nm by Optik-Makario, Germany. At the moment, I am using a 18-70mm and an 18-200mm lens by Nikon. I have used other lenses such as a 50mm, 105mm and even a 85mm Petzval lens too. Using anything other than the 18-70 and 18-200mm lenses make things a bit more complicated because I have to use the camera's liveview.
Now let's talk about how I edit an Infrared photograph...
Below is the original photograph fro
How to make a precut stock - TutorialStock and Resources
This tutorial should show you the way to cut out a tree, which has mostly a sky-background. I do this with photoshop CS5. I have a german language version, but I will describe it with photos, so you should found it in your language also (I have to do it with english tutorials too, so I know, that it will funcition.) 1. My photo and reduced only to the tree.
2. Now erase the sky-background with the eraser-tool3. Click in the sky
4. If you click to close to the leaves or in the tree and you will see this, go one step back. It is necessary to have a good look to your cut out, so that you can see faults:
5. Click in the sky between the leaves with a smaller eraser-


Nebula Painting TutorialTrying to explain nebula painting is like trying to explain how to engineer a bridge (my other profession). If I start at the very basics we'll all die of boredom before we get a beautiful picture. This is an art tutorial, so I will favor pictures over words.
So, lets start with a crucial idea:
The basis of realistic nebula painting is shape randomness.
I have found that my best nebula are those that I didn't plan at all, they emerged from me haphazardly spraying with a brush and then I picked out some cool shapes.
So lets begin:
Step 1: Background Stars
The creation of stars is outside the scope of this tutorial. My method is to use a custom brush with lots of size, scattering, and opacity variation. You can also use noise layers to create a quick starfield.
For a quick guide to stars, see this: Stars from Noise Tutorial by For-as
These stars are painted on a black layer set to Linear Dodge.
Forest Photography TutorialAnimals, Plants, & Nature WeekHello reader!
I am Nelleke, and I was asked to write an article about forest photography. Which is my favorite subject of photography! There is something about them that is timeless. Of course there's a reason forests get used so much as a backdrop in stories and movies... They can give you the feeling something magical is waiting just around the corner.
In this article I will discuss several points, some a bit longer than others. They are Composition, Conditions, Equipment and Editing.
---
Composition
You might have seen a beautiful forest scene once, but noticed after taking a picture that it looks very different. A picture lacks the depth your eyes can see while walking in a forest. Which can result in a picture of just a flat bunch of trees.

Long Exposure TutorialThis tutorial is for everyone who loves the magic of night photography, surreal effects, use of lights, and long exposures even at daylight! Or just for everyone who wants to try this section of photography. I used some of my own pictures as examples for the topics I am talking about. Every picture has the EXIF/camera data, so you can see how I took this photo!<da:thumb id="428957389"/>
Photography at night
The easiest way and also the cheapest to get long exposures is to take photos at night. The whole photography is a triangle: http://4.bp.blogspot.com/_fxbalKKB9mw/ScJbsMEPLLI/AAAAAAAAAlo/fV7m4syiOvw/s320/Exposure+Triangle.gif To get the right exposure, shutter speed, aperture and ISO are the main parts. If you have less light, open the aperture and ISO and shutter speed are constant. If you use a higher ISO you can keep your shutter speed and your aperture, and if you use a slower shutter speed (longer exposures) you can keep the ISO and the aperture! And this is what we need for night photography!
I
Mandelbulb 3D Tutorial 4: Basic TipsMandelbulb 3D Tutorial 4: Basic Tips
First thing we'll cover are some tweaking tips. Tweaking, not to be confused with Twerking. Almost everyone does it. It's one of the best ways to learn. This section of the tutorial will cover some of the basics that will hopefully help new MB3D users with tweaking. Just don't let words like iterations, raystep multiplier and stepthwidth limiter scare you off. You don't need to know the math behind these things. Just consider those words as lables to show you where a setting is and you'll do fine. That's what the GUI is for, to make using the program fairly simple. I'm going to use a sample parameter of mine from about 2 1\2 years ago which is a tweak in a long line of tweaks. You will find that I am guilty of a few things that I'm going to cover, so it's a good example.
As always, I like to mention that I am not a tech giant. I really don't know a lot of the technical aspects of Mandelbulb 3D. If you are interested in the technical
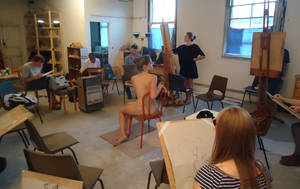
How to: AnatomyHuman anatomy is, for sure, one of the hardest things to draw. But at the same time it's one of the most interesting things to draw, because... hey... we love making characters, and it's nice if they at least look a bit like a human being. I'm still far from perfect at drawing the human body, yet I've accumulated some very useful tips, tricks and websites.<da:thumb id="341147154"/>
Good exercises
Drawing from life
Drawing from life is awesome!
Look for life drawing classes in your environment, or if they're not available; ask your friends to pose for you. Go have a drink in the city when the weather is nice, and sketch people passing by. There's nowhere you learn more about human anatomy than by observing and sketching real people. There's only one downside to this; dynamic poses are tricky, as it's hard for any model to hold a difficult pose for a long time.
And no... drawing (nearly) naked people in a drawing class isn't awkward. I
Quick Photo Manip Tips and TricksPhoto Manipulation Week
For the last week, I've reached out to you guys to find out what kind of tutorials you would be most interested in seeing! Once I collected the topics, I reached out to as many artists that I could find that were advanced in those topics to help write a "mini" tutorial full of tips and tricks for you guys.
"Overall Painted Look"
:iconSummerDreams89:
"My techniques is pretty much simple and the soft painted look can be achieved quite easily. What I do is:
Using a spot healing brush I remove spots, if any from the skin.
Then use a mixer brush over it using the following values:
Wet: 17%, Load: 15%, Mix: 17%, Flow: 18%, which not only smoothens the skin but also softens it.
At the end of it all, I dodge and burn wherever necessary. Alternatively, I use a white brush of low opacity somewhere between 30-35% and paint over the highlights, then apply a Gaussian blur of 15-16 pixels. and for the shadows I go over them with a much lower opaci